How to Install this Widget?
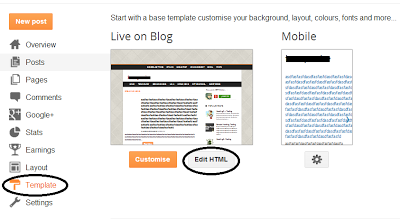
- Go to Blogger Dashboard > Select the Blog > Go to Template page of the Blog
- Click Edit HTML button
The CSS
Add the Following CSS Code before
]]></b:skin>
.w2bmenu *{margin: 0;padding: 0;}
ul.w2bmenu {list-style: none;line-height: 1;overflow: visible !important;}
ul.w2bmenu:after{margin: 0;padding: 0;content: ' ';display: block;height: 0px;clear: both;}
ul.w2bmenu li{list-style: none;position:relative;float: left;margin: 0 !important;padding: 0 !important;}
ul.w2bmenu li a{margin: 0;padding: 12px 16px !important;font-family: 'Helvetica Neue', Arial, Helvetica, sans-serif !important;color: #6b6b6b !important;text-shadow: 0 1px 0 #fff;font-weight: 700 !important;text-transform: uppercase !important;font-size: 12px !important;display: block !important;border: 0 none !important;}
ul.w2bmenu li a:hover,ul.w2bmenu li a.hoverover{background: #f5f5f5 !important;}
ul.w2bmenu ul{position: absolute;display: none;top: 100%;border:1px solid #ccc;}
ul.w2bmenu li:hover > ul{display: block;}
ul.w2bmenu ul li{float: none;min-width: 160px;background:#f5f5f5;text-shadow: none;}
ul.w2bmenu ul li a{padding: 12px 14px;text-transform: none;font-weight: normal;}
ul.w2bmenu ul li a:hover,ul.w2bajaxmenu ul li a.hoverover{background: #fff !important;}
ul.w2bmenu ul ul{display: none;left: 100%;top: 0;}
ul.w2bajaxmenu li div.submenu {display: none;position: absolute;width: 600px;z-index: 90;left: -1px;top: 100%;overflow: hidden;min-height: 150px;background: #fff;border:1px solid #cccccc;border-top: 0 none;}
ul.w2bajaxmenu li:hover div.submenu {display: block;}
ul.w2bajaxmenu ul ,ul.w2bajaxmenu ul li{display: block !important;border: 0 none !important;margin: 0 !important;padding:0 !important;}
ul.w2bajaxmenu ul li{background: none !important;float: none !important;}
ul.w2bajaxmenu ul.verticlemenu{position: absolute;width: 33%;left:0;top:0;bottom: 0;background: #f5f5f5;}
ul.w2bajaxmenu ul.postslist {position: relative;display: block;width:65%;float: right;margin: 8px 0 !important;background: none;}
ul.w2bajaxmenu ul.postslist li{display: block;overflow: hidden;border-bottom: 1px #eee solid;position: relative;min-height: 60px;padding: 8px 8px 8px 110px !important;}
ul.w2bajaxmenu ul.postslist li:last-child{border-bottom: none 0;}
ul.w2bajaxmenu ul.postslist li .imgCont{position: absolute;left: 0;top:8px;width: 100px;height: 60px;overflow: hidden;border:1px solid #dcdcdc;font-size: 0;line-height: 0;}
ul.w2bajaxmenu ul.postslist li .imgCont img{position: relative;top:-20px;padding: 0;width: 100px;height: 100px;display: block;}
ul.w2bajaxmenu ul.postslist li a{display: block;line-height: 1.4;padding: 0 !important;}
ul.w2bajaxmenu .loader{background:url('http://i.imgur.com/SeivG.gif') no-repeat scroll 0 0 transparent;width:22px;height:22px;position: absolute;top:50%;margin-top: -11px;right:5px;}
ul.w2bajaxmenu .menuArrow {border-bottom: 4px solid transparent;border-top: 4px solid transparent;border-left: 4px solid #999999;display: block;height: 0;margin-top: -4px;position: absolute;right: 11px;top: 50%;width: 0;}
#w2bajaxmenu {background: #ededed;background: -moz-linear-gradient(top, #ededed 0%, #e0e0e0 100%);background: -webkit-gradient(linear, left top, left bottom, color-stop(0%,#ededed), color-stop(100%,#e0e0e0));background: -webkit-linear-gradient(top, #ededed 0%,#e0e0e0 100%);background: -o-linear-gradient(top, #ededed 0%,#e0e0e0 100%);background: -ms-linear-gradient(top, #ededed 0%,#e0e0e0 100%);background: linear-gradient(to bottom, #ededed 0%,#e0e0e0 100%);filter: progid:DXImageTransform.Microsoft.gradient( startColorstr='#ededed', endColorstr='#e0e0e0',GradientType=0 );border: 1px solid #cccccc;}
The JavaScript
If your Blog has jQuery plugin, then don’t add this plugin in your blog template,
Otherwise add the below line of code before
</head> tag
<script type="text/javascript" src="http://ajax.googleapis.com/ajax/libs/jquery/1.8.2/jquery.min.js"></script>
Add the following Javascript code before
</head> tag
<script type="text/javascript" src="http://widgets.way2blogging.org/blogger-widgets/ajaxbloggermenu.min.js"></script>
<script type="text/javascript">
jQuery(document).ready(function($) {
$('#w2bajaxmenu').ajaxBloggerMenu({
numPosts : 4, defaultImg : 'http://url-to-image.com/default-image.jpeg' });
});
</script>
The HTML
In this section you should be carefully add the HTML, otherwise it won’t works.
The AJAX Menu accepts three types of urls. You must use this urls only in the menu. They are
Label,
Search Query and
Label w/ Search Query.
| Label URL |
http://yourblogdomain.blogspot.com/search/label/LABELNAME |
| Search Query |
http://yourblogdomain.blogspot.com/search?q=SEARCHQUERY |
| Label w/ Search Query |
http://yourblogdomain.blogspot.com/search/label/LABELNAME?q=SEARCHQUERY |
Note:- Search Query must be Url encoded. You can use this tool to encode your search query.
Use this MENU Example code and add it in
HTML/JavaScript gadget.
<ul id="w2bajaxmenu" class="w2bmenu">
 <li>
  <a href="#">Home</a>
 </li>
 <li>
  <a href="#">Example 1</a>
  <ul>
   <li><a href="http://yourblogdomain.blogspot.com/search/label/AdSense">Sample Label</a></li>
   <li><a href="http://yourblogdomain.blogspot.com/search/label/Gadgets?q=harish">Label w/ Search</a></li>
   <li><a href="http://yourblogdomain.blogspot.com/search?q=way2blogging">Search Query</a></li>
   <li><a href="http://yourblogdomain.blogspot.com/search?q=This+is+long+query+you+do+not+get+any+results,+so+try+others">Unknown Search</a>
  </ul>
 </li>
 <li>
  <a href="#">Example 2</a>
  <ul>
   <li><a href="http://yourblogdomain.blogspot.com/search/label/Design">Design</a></li>
   <li><a href="http://yourblogdomain.blogspot.com/search/label/Facebook?q=Like+Button">Facebook</a></li>
   <li><a href="http://yourblogdomain.blogspot.com/search/label/Templates">Templates</a></li>
   <li><a href="http://yourblogdomain.blogspot.com/search?q=Guest+Posts">Guest Posts</a></li>
  </ul>
 </li>
 <li><a href="http://yourblogdomain.blogspot.com">Normal Link</a></li>
</ul>
Finish


 Posted in: