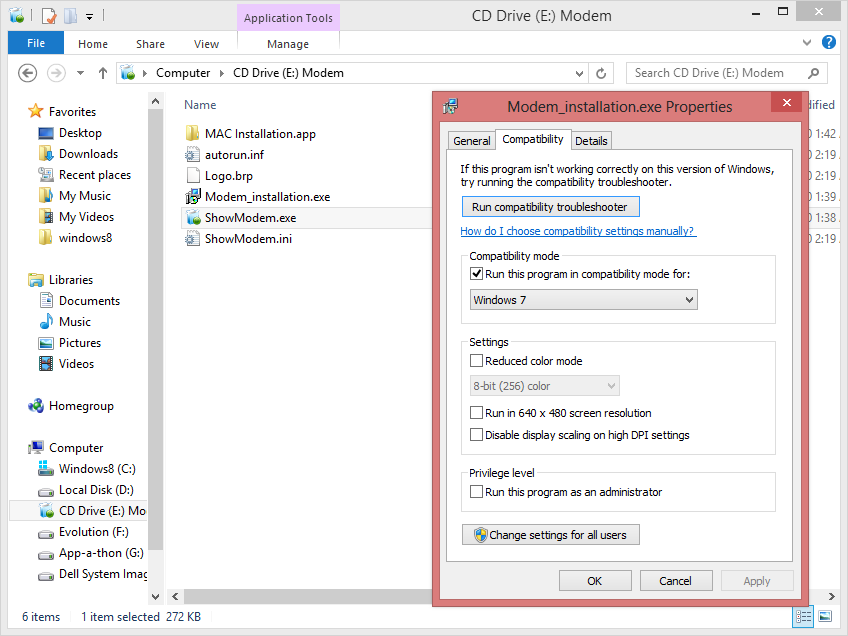
Method 2 (Updated Article January 2014 for Win 8/8.1 both):
1. Install the MMX modem application in compatibility mode as above, then restart your system.
2. Next go to your installation folder as:
x64 bit OS –> C:\Program Files (x86)\MMX353G 3G USB Manager\Driver\Win7_64
x32 bit OS –> C:\Program Files\MMX353G 3G USB Manager\Driver\Win7_32
3. copy the file cmnsusbser.sysand
paste it to C:\Windows\System32\drivers folder do replace if any older
version is already present. Better save the older file before replacing
it with new one.
4. Now, go back to installation folder and simply:
right click cmnsmdm.inf and click install,
then right click cmnsser.inf and click install.
5. So its done then, only note that you must open the application
from the desktop icon. Enjoy your MMX 3G modem in windows 8.1. Have fun
guys.
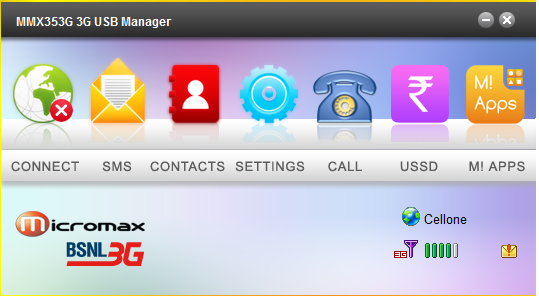
How to Connect Micromax MMX353G USB Modem in Windows 8/ 8.1
First, install the latest device driver for Micromax MMX353G USB dongle. And
Close the Micromax USB manger from desktop and exit the Micromax MMX353G USB
dongle completely from system tray (right click and choose exit).
Then, go to C – Program Files – MMX353G USB Manager – Driver.
Locate the file “InstallDriver.exe” and run it. After installing the driver,
restart your computer and open “MMX 353G USB Manager” from desktop.
Open Device manager (just start typing device manger from Windows 8 start
screen), and expand “Others”. Uninstall all “USB modems” listed that has a
question (?) mark.
If “Others” isn’t listed, expand “Port” and uninstall the following:
1. Device Application Interface.
2. Device Diagnostic Interface.
3. Device Pipe.
Now, right click device manger name and click “Scan for hardware changes”.
Start the MMX 353G USB Manager. The software will detect the modem and now you
are ready to connect.
Windows 7 automatically saves all the recent searches done by the users.
Some people are annoyed by this feature as the last three searches become
visible under the search box as you start typing in it. If the computer is
shared by others, you might not want others to see your past searches. There
is a way in which you can disable search history display in Windows 7.
However, you cannot disable search history display in Windows 7 Home
editions. This is due to the fact that you need to utilize the Group Policy
Editor for achieving this goal and it is not available in the Home versions.
Follow these steps to disable search history display in Windows 7.
Enter
gpedit.msc
in the search box of the Start menu. Press Enter. This will open the Local
Group Policy Editor.
Scroll down to User Configuration \ Administrative Templates \ Windows
Components \ Windows Explorer.
Double-click on Turn off display of recent search entries
in the Windows Explorer search box on the right hand side of the dialog box.
Select Enabled and click on the Apply button.
Click on the OK button.
Close out of the Group Policy Editor.
From now on, you won't be bothered by the display of recent search history
as you start typing into the search box.
Facebook is the most popular social network out there. Achieving
millions of user is an amazing achievement for a social website.
Nowadays people spend their time on Facebook more than on their real
life, some are updating their status, chatting, and etc. Mentioning
about Facebook chat, recently Facebook had updated their features which
people can now chat using emoticons. This is one interesting update from
them where lead me to create this post.
Below I list out some of many emoticons you can find out there. You
can use it during your Facebook chat. Just type the simple code into the
chat box and press “Enter”.
Here you are:
You can get more hidden Facebook emoticons and smileys here and here. There are more than hundreds out there, have a nice chat with your friend.
If you are using Chrome or Firefox than the best way to skip or bypass these links is to install a simple userscript called “AdsFight!”, it’s a simple one time install bypasser which automatically skips links as soon as you click on them.
Installing AdsFight! on Chrome
Go to Userscript.
Hit the “Install” button.
You are done.
Installing AdsFight! on Firefox
Go and install Greasemonkey Add-on for Firefox
Go to Userscript and click “Install”.
You are done.
METHOD 2 This method which makes the use of installed addons and userscripts is strictly restricted to computers. If you use firefox, then install either greasemonkey or scriptish, after which you must install Ads Skipper addon. To install it, click on the install button.
Chrome users should just install AdsFight! while Safari users should first install Ninkakit and then Ads Skipper.
Search for apps, control panels, and files.
Add your favorite apps, sites, files and folders for quick access.
Boot to the desktop and skip the Windows 8 Start Screen.
Disable Windows 8 hot corners on the desktop and more.
Get free apps and games from the included Pokki App Store.
1. Windows 8 Start Button
How to add a Start button to Windows 8?
Just install Start Button 8!
The package contains a Start button and a convenient Menu. A ready solution for those who like to keep everything under control.
The Pop-up dialog box is used to give the short description of the link with on
a Popup dialog box whenever a user clicks a specified link in your fan page.
For instance,You have used pop-up box for the ‘About’ Link on your page then it
will show the popup box as above when your fan click on the link and the ‘learn
more’ link can be even redirected to your About page.
About Us Bloganol is a Blog About Tech, Social Media,
Opensource and more.
Would you like to learn more?
Previously in our blog we have already published a post about Ultimate Tricks
and applications to make your facebook page a masterpiece. On that post adding
a poll on a Facebook Page was also included but it was using the direct
Facebook application.
In this page we are talking about inserting Polldaddy polls on your fan page in
a Tab using the Fbml. Copy-Paste the following Fbml to insert polldaddy polls
on your Facebook fan page. Remember to replace POLL_ID with your Poll id from
Polldaddy before you save.
3. Inserting Flash Content
Inserting Flash Content on your Facebook page is also like inserting YouTube
video in your Page. Use the Fbml to insert Flash content n your page. Use the
Flash file URL in the swfsrc and use the image URL on imgsrc as the source of
the image that is being displayed, before your flash.
4. Adding a Chat Room
Adding a chat room on your Fan page enables you to chat with your Fans when
they are on your page. Firs thing you need is to create a Flash based chat
widget for your Facebook page using MeeboMe and then embed that Chat widget on
your Facebook Fbml box usng the code below.
Remember to replace CHAT_ID with your widget chat Id provided by Meeome before
you save the code.
5. Adding a share button
A share button on your Facebook page lets your fan to share the provided link
on their Facebook profile easily. You can use the following code on Fbml Box of
your Page to insert the ‘Share’ button on your fan page.


 Posted in: